Trending

Sunday, June 8, 2014

Fitness Friday: Quick At Home Circuit Workout

Okay so technically it's Sunday. So this post is only a few days late.
In all honesty, it was ready to go on Friday, I went to upload the photos and found they had become corrupt, so had to take them all again yesterday. So I could have uploaded this post yesterday. Except that I had to smash out as much as I could of this research essay I'm working on so I could go to a friend's housewarming. Priorities, yo.

A little while ago, I shared with you my at-home exercise essentials. Today I'm going to share with you how you can put some of that together and create your own at-home circuit workout!


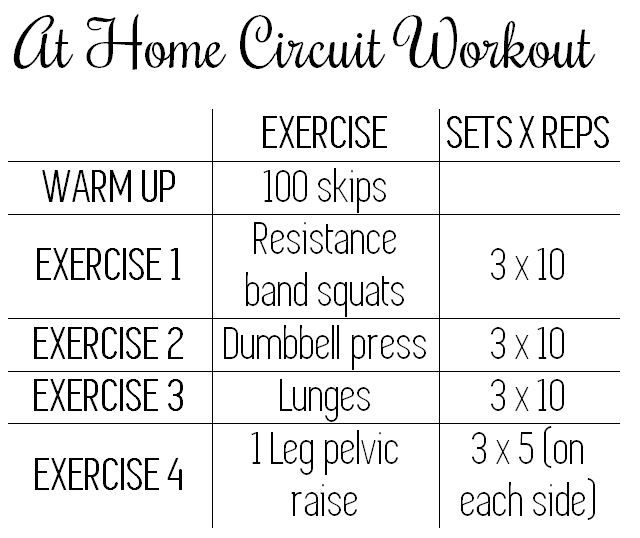
The idea of a circuit workout is that after completing 10 reps of each exercise, you move on to the next one. You can do this because each sequential exercise uses different muscles. For instance, resistance band squats are a leg exercise, dumbbell press is an arm exercise - while you're doing the arms exercise you're 'resting' the legs. So, to complete this workout, run through 10 reps of each exercise, and then run through the whole 4 exercises three times. So at the end you would have completed 3 sets of 10 reps for each exercise. Easy!

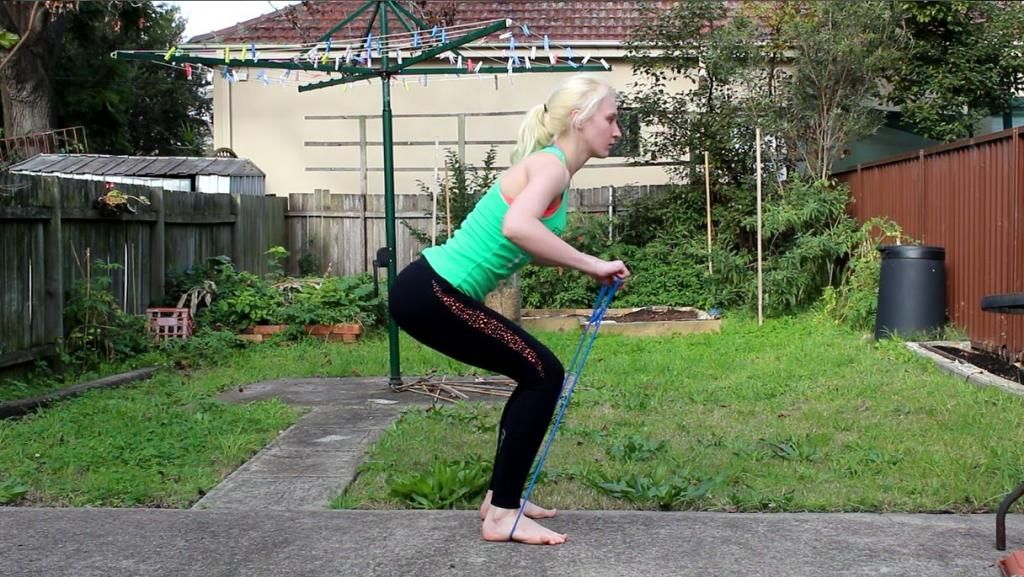
RESISTANCE BAND SQUATS
Pull up on a resistance band as you lower in your squat to make the humble squat a little more challenging. If you don't have a resistance band feel free to just do a normal squat! 

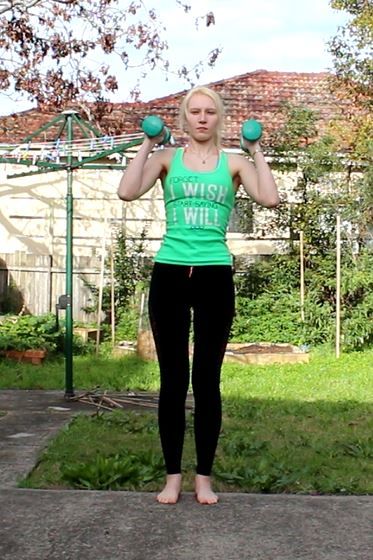
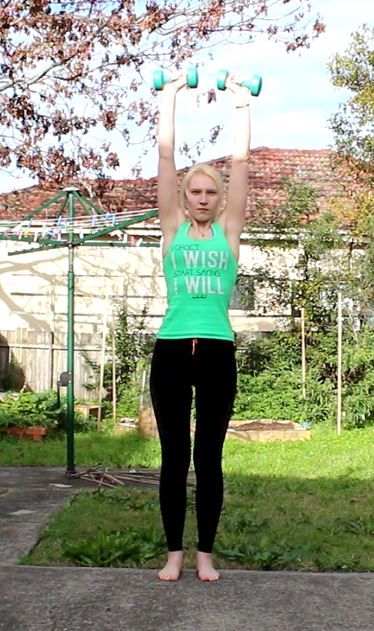
DUMBBELL SHOULDER PRESS
Holding some dumbbells (or milk cartons, or bricks or whatever else you've got laying around the house), lift the weight to just outside your shoulders, palms inwards and elbows tucked in. Brace those core muscles, look straight ahead and lift the weights in an arc so they meet at the top, almost touching each other. You need to gradually turn your palms as you arc to the top, so that at the highest point, your palms are facing the front. Pause, then lower to starting position. That's 1 rep. 
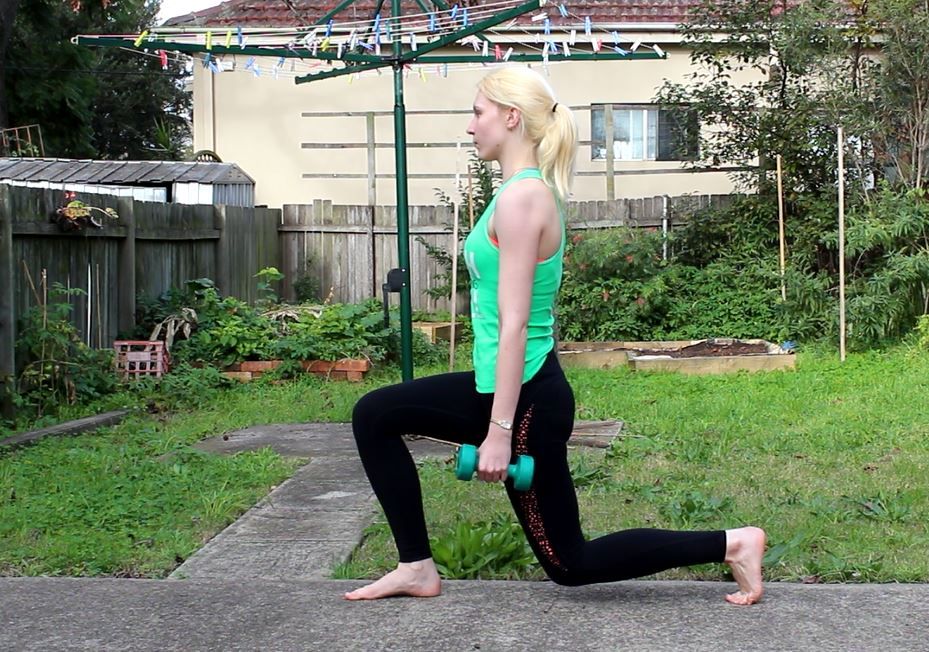
LUNGES
Add some weights to really challenge your leg muscles in this move. Check out this post here for tips on form. 

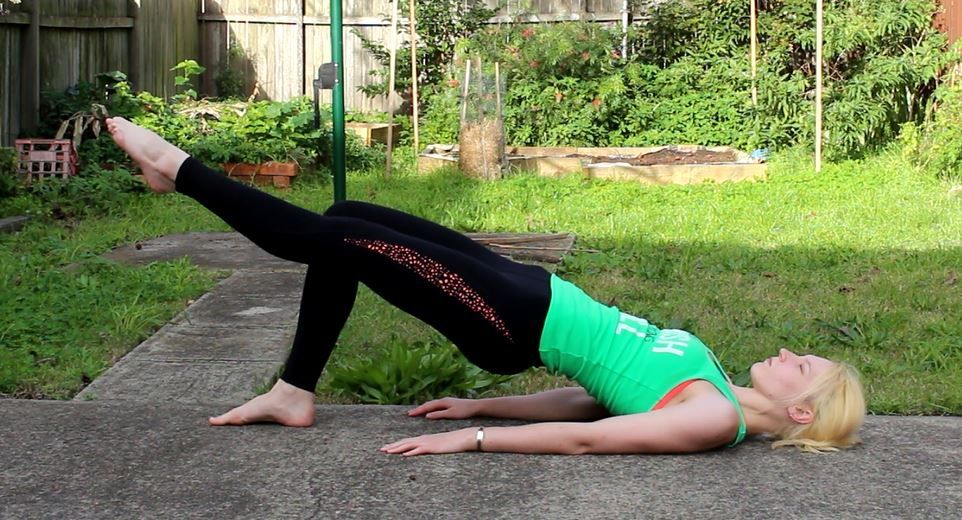
SINGLE-LEG HIP THRUSTS
No equipment needed for this one, which helps activate the muscles in your butt and your abs. 
Lay on your back, with palms facing down, bend your knees so they're just past 90 degrees, with your feet flat on the floor. Raise one foot of the ground, and hold the leg in the air. Push with the foot still on the ground, raise your hips and push them as high as you can. Clench your butt as you raise. Pause for a second, then slowly lower. That's 1 rep on 1 side. So this one is 5 reps on each side (10 in total) before you can move on! It's up to you whether you alternate legs or do all reps on one side. 


What are your favourite at-home workout activities?

post signature

Twitter | Youtube | Instagram | Pinterest | Bloglovin
SHARE:

Friday, July 12, 2013

Tutorial: Green Eyes


This is one of my favourite eye make-up looks, and I always get compliments when I wear it. 


These are the main colours I've used in this tutorial; 

INGLOT: matte 372 (top green) and 504 (bottom green)
URBAN DECAY: Sin and Naked, both from the Naked palette. 


To really intensify the colour, I've used Maybelline's Colour Tattoo in Edgy Emerald as a primer. If you don't have this, you can just use a regular primer, or even one with a white base to make the colour pop. 


1. I apply the colour tattoo with an Ecotools concealer brush. I just really like the shape of this brush for slathering the colour across the eyelid. 
2. From the inner corner to about halfway across the eyelid, apply the matte green. 
3. Continue into the outer corner with the darker green. 
4. Smudge some more of the darker green into the crease, to create more definition and dimension. Make sure you blend in this colour well. You want to create somewhat of a gradient between the two colours. 
5. Blend out the edges with a fluffy brush. At this stage I've added a bit of Naked to the browbone and blended it in as well. 
6. My eyes are quite small, so rather than using an eyeliner on my waterline, I continue to blend Naked down to the outer corner of my bottom lash line. 
7. I add a bit of Sin to the inner corner, to brighten up my eyes
8. Finish off with some eyeliner on the top lashline and a coat of mascara. 


I've been using the Volume Glamour Max mascara from Bourjois...I love the thick bristles for adding heaps of volume to my lashes. 


Keep the rest of your face fairly neutral...I'll usually apply a tinted lip balm for a hint of colour. Really though, you want your eyes to be the focus of this look. 

Have you rocked green eyes before?

post signature

Twitter | Youtube | Instagram | Pinterest | Hellocotton | Bloglovin
SHARE:

Thursday, May 23, 2013

How To: Apply False Eyelashes


FAR OUT I LOVE FALSE EYELASHES.
The first time you apply false eyelashes is really, really hard. It can be fiddly, confusing and frustrating.
As with most things in life, there is more than one way to do something. If you try out my method below and find out it doesn't work for you, then check out Michelle from Lab Muffin's here, because hers is slightly different to mine. This tutorial is just going to cover strip eyelashes. If there's demand for it, I might write up another post later about individual lashes.

So, strip lashes are always going to be too long for your lash line, and you'll need to trim them first. I usually just use a pair of nail scissors for this part. Take the lashes out of their packet, and hold them up to your upper lash line. Unless you're Asian, you want them to end about half a cm in from your natural lash line, so that's your trimming point. Always trim from the end, and not the inner part, because the lashes on that side are generally shorter.

Also - applying false lashes is the LAST part of your eye makeup routine.


So all you need is the lashes, some glue and some tweezers. I personally prefer Duo glue, they have one for sensitive eyes (above) and a standard one as well. I find it dries quickly, doesn't irritate my eyes and the best part is it has a brush-on applicator, which makes it really easy.


Picking up the eyelashes with your tweezers, lightly brush on a small amount of glue onto the lash line. As you can see in the picture above, you only need the tiniest amount - in fact, less is definitely more in this case.

The most common problems people have with applying false eyelashes is applying too much glue and not allowing it to dry. Think of it this way; you can always apply more quickly if you haven't applied enough, but you'll be waiting longer (and may even need to start over) if you apply too much. So a light coat is all that's needed. Give it about 10-15 seconds to dry. Sometimes waving the lashes in the air can make it dry a bit quicker. I know this is counter-intuitive, but when it dries it will be a tacky consistency, which will help them stick to your eyelid better. If it's still too wet, it won't be able to stick and will slide around on your eyelid. FRUSTRATING.


Position the eyelashes in the centre of your eye - like I mentioned earlier, you want the end to be about 0.5 cm in from your natural lash line so it doesn't drag down your eyes. Disregard this part if you're Asian though - generally Asian eyes have a straighter lashline, so the lashes won't droop. 


So I usually stick the middle part down with tweezers and then once they're positioned, stick the inner and outer ends down with my fingers. Gently pressing them together with your natural lashes will make them blend in a bit more, and help you get as close to your lashline as possible. 

It's really that simple! Repeat for the other side (obviously) and flutter, flutter away! 

So now I ask you guys; 
What's your best "applying false lashes" trick?

post signature

Twitter | Youtube | Instagram | Pinterest | Hellocotton | Bloglovin


SHARE:

Tuesday, October 16, 2012

Nails of the Week #4

This week on my nails I'm sporting a bit of a twist from your classic 'French Manicure'. Take a look:


Excuse the slight messiness on some of the nails. I'll explain below why it didn't turn out perfect, how you can create the look yourself, and what not to do (so yours turn out better than mine!)
But firstly, these were the colours I used:

 
Cutex 2-in-1 base coat, Revlon 620 "Bewitching" and O.P.I "Black Onyx". 

You can use any colours you want, but I find using two colours that really contrast against eachother work really well. 

How to do it:

1. Firstly you're going to want to make sure you have no excess nail polish on your nails, and file and shape them. Then add your base coat. I always, always, always apply a base coat every time I paint my nails. Not only does it make your nail polish last longer by creating a smooth base but it also stops discolouration of your nails. 

2. Then apply your base colour. I'm using "Bewitching" by Revlon. 

Don't worry too much about messiness at this point. You can go back and remove excess nail polish on your fingers with a cotton bud dipped in nail polish remover. 

3. Wait at least 20 minutes for that colour to dry thoroughly. Then, apply some tape at the tips of your nails. Leave enough room to create a noticeable line. 


I used this french tip tapes by Manicare, but honestly you could use masking tape. Just make sure you cut a nice 'half moon' shape. Whatever you do use though, the trick really is to make sure it's not too sticky. 

4. Wait again, until that colour is completely dried, and carefully peel the tape off. Voila! Clean off the excess polish, apply a top coat and you're done!


I really need to stress how important it is to wait until the nail polish is completely dry. Otherwise the tape will  lift up the colour and you'll be left with something ugly like this:


Honestly, I don't know if I would re-purchase those Manicare tapes for this type of french tip. On the packet, they advise that you paint the tip white, then go over with the light pink. Obviously that's not really going to work if you're using two bright colours, which is why I did my base coat before the tips. They are a bit too sticky and do tend to rip the polish right off. Obviously this creates an issue when you go back and repaint it. Too much polish layered on top of eachother just makes it more likely to chip, and in this case - this look didn't really last that long.

When I try it again, I'll probably stick to masking tape.

What's your best "french tip" tip? Do you go for the more subtle pink / white look, or do you prefer bold, dramatic colours?

\ post signature

Twitter | Youtube | Instagram | Pinterest | Hellocotton | Bloglovin
SHARE:

Saturday, October 13, 2012

TAG: 5 Minute Makeup Challenge!

I've decided to do the 5 minute makeup challenge tag that's been floating around Youtube.
(In other news: check out the massive bitch face going on in that thumbnail!)

It's exactly what it sounds like; do a full face of makeup in 5 minutes or less. The challenge was a bit easier than I thought it would be, but you definitely feel a bit pressured as the timer counts down!


Check out how I went here:


How long does it take you to put on make-up in the mornings? 

post signature

Twitter | Youtube | Instagram | Pinterest | Hellocotton | Bloglovin
SHARE:

Saturday, August 25, 2012

Beauty Tips: Cleaning Your Brushes

I thought that today I'll quickly take you through how I wash my brushes. It's taken me a bit of trial and error to get a method that really works for me and helps get my brushes spotless. Now that I've got it down though, I'm going to share it with you!

How often should I wash my brushes?
This is a question that is often asked. And its answer really depends on how often you use your brushes, and with what products. If you have a foundation brush that you use daily with liquid foundation, then you should wash that about once a week to help keep germs away. If you use a powder foundation, you can get away with washing your brushes a lot less often - maybe once every three weeks, or once a month.
I spot-clean my eye brushes every time I use them. The method I am going to show you is super quick so not only is it really easy, but you don't really have the excuse of it being too much of a hassle.

The method I'm going to show you below is my montly full-on clean. But it also includes spot cleaning at the beginning.

What do I need?

This is literally all you will need to clean your brushes. The brushes (obviously), some paper towels, olive oil and a cleanser. Some people like to use shampoo - but I don't like the way that it makes my brushes smell (I'm really particular with scents...) so I use Cetaphil. This is a really gentle cleanser, with no scent. I've heard of people also using anti-bac dishwashing liquid but I feel that not only is that taking it a bit too far, but you don't really need anti-bac since you're cleaning everything off the brushes anyway.

How do I clean my brushes?


I start with a paper towel, and fold it into ninths so you end up with a little square. 
This is how you're going to spot clean the brushes. 


Dab some olive oil on it, and then wipe the brushes in the olive oil. This is going to get all the colour and product off the brushes to begin with. This is why this part is so good for spot-cleaning, especially with eye brushes. If you're going from a dark to light eyeshadow, just wipe the dark colour off, leave it to dry for about 5 minutes and continue on your merry way. 


Continue to do this with all your brushes. You'll probably be a bit horrified at first at just how much product comes off them. Gross, yeah?

But once you're done that, your brushes are more or less clean. It's just on to giving them a bit more of a scrub. 


Get a tiny amount of the soap / shampoo that you've chosen to use and put it in the palm of your hand. Add a bit of water, and just gently swirl the brush into your palm. This will really help clean it. 
NB: If you're using Cetaphil - this product doesn't lather that much. But! Fun fact of the day: Lathering is a marketing scam and makes no difference to how well the soap actually cleans. So don't be put off by that. If anything, I think it's better for your brushes because it's not as harsh. 

Anyway, continue to do this with all your brushes, and make sure they're rinsed thoroughly. Be careful to not let any water or soap get into the ferrule. That's the metal bit that binds your brush hairs together. Getting water in there can upset the glue and make your brushes fall apart. And, I'm guessing, that since you've paid good money for them that's the last thing you want to happen. 


Finally - lay them all flat to dry, on top of a paper towel. I prefer to use quality paper towels (like Viva) because they do actually absorb more water. 


Be careful that you don't pull on the brushes, and don't fan them out or tug on them while they're wet. Again, this can damage them and pull the fibres out. 


I usually leave them laying flat like that on my kitchen bench for about an hour or two, then will move them so  the brush heads lean over the edge. That way, they continue to air-dry. I'd leave them there overnight, come back in the morning and have them all dry and fluffy!

SHARE:

Tuesday, August 7, 2012

Neutral Smokey Eye in Six Steps!

So since my Urban Decay Naked palette arrived, I have been obsessed with eye makeup. I've had a few real-world friends comment in passing that they are a bit scared to wear more eye makeup other than the standard eyeliner / mascara combo, in fear that they'll look way overdressed.

Today I'm hear to show you that firstly, no - being over-dressed is always better than being underdressed. and secondly, a neutral smokey eye can do wonders to brighten up and draw attention to your eyes.

Let's begin after the jump:

SHARE:
© Where is my mind?. All rights reserved.
Blogger Template by pipdig