Trending

Friday, June 27, 2014

Fitness Friday: Leg Day

I do a lot of upper body work-outs, because of pole. So it's really important for me to include a specified routine in my workout regime that targets my legs.
I normally warm up with a brisk 15 minute walk on the treadmill. I hate running on the treadmill, it just feels really unnatural for me (I'm sure I'll get there one day), so for now I walk at 6.5-7km/h on a really high incline (usually starting at 2% incline, moving up to 10% by the end).
I'll then gently stretch it out a little, and then carry on with the below:


For the first set of 10 reps of each exercise I will 'warm up' through the range of motion, by starting at a lower weight. 
If you're  not sure what weight you should be starting out on, the basic rule is that you should be able to do 8-10 reps. The 10th rep should be really difficult. If you can do more than 10 reps, the weight is too light for you. If you can't get to 8, then the weight's too heavy. Of course, at all times, you need to be aware of your form. So if you can get to 10 reps, but your form is failing, then the weight is also too heavy, so dial it down a little. 

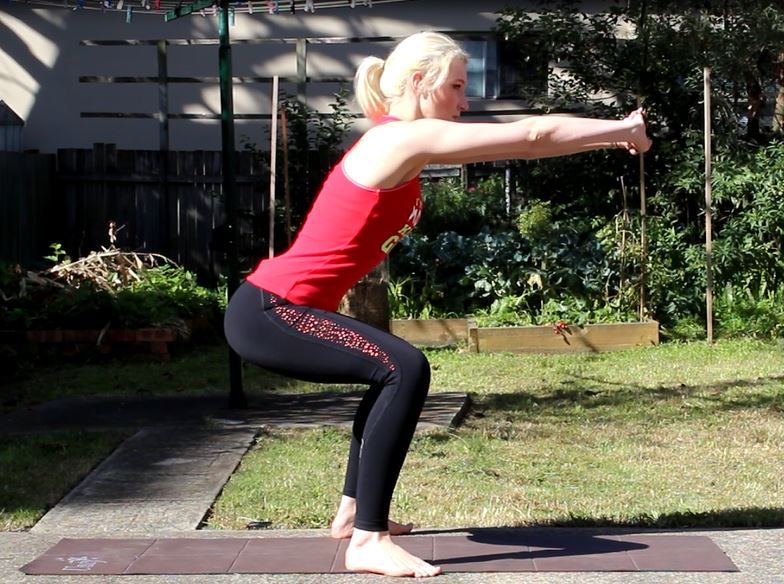
I personally currently lift: 1 set of 10 reps 20kg squats; then 2 sets of 10 reps at 25kg squats. 
1 set of 10 reps 15 kg deadlifts; then 2 sets of 10 reps 20 kg deadlifts.
For weighted lunges, I use 7 kg dumbbells.
For both the hamstring curl and leg extensions, I do 39kg. 

Rest for a minute in between each set. 

For detailed information on how to perform each exercise, check out these instructional videos:
(I'm not affiliated with this guy at all, but these videos are what I used to learn to do these exercises. Sharing is caring. It's a good idea to have someone check your form, and have a spotter if you're new to these. A personal trainer is awesome. Otherwise, start with light weights (5kg for eg) and film yourself, so you can double check your form.) 


I use the machine for hamstring curls / leg extensions, so if you're not sure how to do them, most machines have little diagram pictures, otherwise ask someone at the gym! 

And that's my whole leg routine! Let me know if you have any questions or if I missed anything out, or let me know what you'd like to see next! 


post signature

Twitter | Youtube | Instagram | Pinterest | Bloglovin
SHARE:

Tuesday, June 24, 2014

Organisation Tips: Scarves


I've tried SO MANY different ways of organising my scarves... boxes, drawers, tied to a railing, hanging off the back of my door. None of them have stacked up. When looking to organise my scarves, I wanted something that would allow me to see what I have, and easily access it. I also wanted something that made it really easy to put them away when I'm done with them.


Enter this pants hanger I picked up from k-mart! This has five metal rungs, which means it has plenty of storage for my scarves, and it allows me to see them all at one glance. 


Because it lies pretty much flat, it also takes up virtually no space in my wardrobe either, which is a bonus! 


The metal rungs also unhook and swing out, making it super, duper easier to just slip the scarf off the rung if I don't want to untie it. How genius is that!!

How do you store your scarves and winter accessories?

post signature

Twitter | Youtube | Instagram | Pinterest Bloglovin
SHARE:

Friday, June 20, 2014

Fitness Friday: Why You Should Reconsider Participating in a 30 Day Squat Challenge


We've all seen the '30 Day Squat Challenge' floating around on Pinterest and Instagram.
The premise is you work up from 50 squats at the beginning of the month, to 250 squats at the end, and you get an awesome butt for all your hard work.

The issue I have with this challenge, is not with squats. Squats are one of my favourite exercises - they are amazing for your lower body, you can do them anywhere, and almost anyone can do them!
You see a lot of people saying that they're going to start the challenge, and for the first few days, they're keen as beans. But then they miss a day, and then that becomes two days, until they don't know how to get back into it, lose all motivation and never complete the challenge. This is mostly because the challenge is really unrealistic, really inefficient and not that great at actually doing what it promises to do.

But, squats can be really hard. If you've never done any squats before, you may struggle with getting your form correct. (Click here for details). So how can a complete newbie be expected to do 50 squats in one day, when they are quite likely going to be doing them incorrect?

The challenge gives no information as to how to carry out the exercise either, which can not only be confusing for people new to fitness, but can lead to injury. For instance, on day 1, are you doing 5 sets of 10 reps with rest periods in between? Or are you literally pumping out 50 squats in a row? To me, the challenge looks like it's the latter. Without leaving time for rest in between reps, you fatigue quicker which means you're a lot more likely to continue in bad form. That's a great way to injure yourself.

The squat challenge doesn't increase the load as you continue. This means as you continue to add reps the exercise just keeps getting easier because there's no added resistance. So, the more you continue with the exercise, the more inefficient the 'program' gets. To really shape that butt, you need to add weight. You're much better off 8-10 doing squats with a kettlebell, or some dumbbells, or a barbell on your shoulders, than doing 250 body-weight squats in one day.


To build muscle, you need to put that muscle under stress / pressure, and then give it time to recover. This challenge doesn't allow that, as you're squatting high reps three days in a row, and then taking a break. Notice that most people who lift weights only have one 'leg day' a week? That's because you need to give your muscles adequate time off.

Another issue I have with this challenge, is that it implies this is the only exercise program a person will be doing for those 30 days. So what about all your other muscles? Squats mainly train your quads (the front of your thighs) and your butt, but don't really train your hamstrings (the back of your thighs) or your hip flexors. There's no other information in this challenge to work out any other muscles, which means most people won't even consider it, let alone seek out alternative exercises. Not training the inverse muscle means you're setting yourself up for a muscle imbalance, and again, this can lead to injury.

So, what happens after day 30? Do you continue to add reps? Or do you forever continue on just doing 250 squats a day (which is stupid)? Do you pick up a new 30 day challenge? Does this mean you're now neglecting your new butt? These are questions that should have answers!!

30 day challenges like the squat challenge do not work, and have massive potential to lead to injury. You should incorporate a range of different exercises into your routine, rather than sticking with one exercise for a long period of time. Next week I'll be posting my legs routine, so you can see what I do to shape my legs and butt.

Have you done a 30 day challenge like this one before? How did you go?


post signature

Twitter | Youtube | Instagram | Pinterest | Bloglovin
SHARE:

Saturday, May 10, 2014

Fitness Friday: The Form Guide

One of the things that has been really bothering me lately, is that there's an abundance of newly posted 'fitness for beginner' videos and blog posts springing up around the place. And the blogger or vlogger posts a video or some photos of them doing some exercises, to advise their followers on somewhere they can start out.
This is great, because encouraging easy fitness that anyone can do is always a good thing. But, not at the risk of injury. And what a lot of these people don't realise, is that they're demonstrating dangerous ways to do activities. They may not notice that their form is out while they're performing the exercise, but continue doing reps with the wrong form and you could end up doing some damage to yourself. Not cool.

So today I'm going to take you through the basic form for the most common exercises that I see being messed up. This post is a little  quite picture heavy, so click through to read.


SHARE:

Friday, April 25, 2014

Fitness Friday: Dealing with DOMS

Delayed onset muscle soreness (DOMS) is that dull, achey pain in your muscles you get 24 to 72 hours after a workout. It's painful, and the symptoms can last for seven to ten days. Some people like the onset of DOMS, because it indicates you've worked the muscles to a sufficient intensity.

Unfortunately, when it comes to treating DOMS there's a lack of consensus as to what actually causes it.
Believe it or not, many scientists now believe that lactic acid is actually not involved in DOMS, as it does dissipate within an hour of finishing exercising, which is way before DOMS happens. Although there is a lack of consensus, many put it down to micro-tears within the muscle, that occur during eccentric contractions of the muscle (such as running downhill). That being said, it's also been proven in research that DOMS does not necessarily mean muscle damage. There is also some literature that suggests neurological factors come into play. I'm not really going to deal with those in this article.

All this means that there's also some confusion when it comes to treating it. It's pretty much in consensus though, that training with DOMS isn't conducive to improving performance, and can in fact cause injury. So if your legs are killing from those squats, lay off the leg exercises until you're feeling better.

For this reason, it's essential you schedule rest days into your workout routine.
If you're a beginner and you're weight training, progression in loading and increasing reps should be gradual.

It's widely acknowledged that taking non-steroidal anti-inflammatory drugs (NSAIDs) (such as ibuprofen, found in nurofen) can help to alleviate the pain. Note though, this is essentially a mask for the pain, and isn't actually treating the cause of the problem. That can be fine though, when paired with rest.

Getting massages can also help. Although research has been done, it's still unclear as to why it can help alleviate the pain. (There is a lot of scientific literature on this, with a lot of scientific terms) Personally, I find foam rolling my muscles when they're sore (which is a form of myofascial release - similar to what you would get from a sports massage therapist) really helps my muscles feel better.

Usually following DOMS, the muscles contract and become tighter, and stretching can help alleviate this. I find gentle stretching really beneficial. Just remember to never, ever stretch on cold muscles.

So really, the only proven method to alleviating DOMS is waiting it out. Don't risk injury by further training the muscle. You can take ibuprofen minimise the pain and help you get through your day. I personally find foam rolling and gentle stretching (while I'm sore, but also straight after my workout - ALWAYS cool down) really helps my muscles heal faster. There is the theory that it increases blood flow to the area, which assists with healing, but there's not that much scientific evidence to back this up. I also feel that staying active during the DOMS phase makes it go away quicker than if I were to do nothing during that time. Proper nutrition is obviously also important; your muscles can't repair themselves without the proper vitamins and minerals to do so. Basically, DOMS is really complicated, and can really put a dampener on your workout. Just don't let it dissuade you from continuing to be active.

What do you find helps when you have DOMS?

Sources:
Kent, Michael, The Oxford Dictionary of Sports Science & Medicine Oxford University Press, 3rd ed, 2007.

Nelson, Nicole, 'Delayed Onset Muscle Soreness: Is Massage Effective?' Journal of Bodywork and Movement Therapies, vol 17, issue 4, 2013, pp 475-482

Schwarzenegger, Arnold, 'Train through the pain?' Joe Weider's Muscle & Fitness, vol 62, 2001, p 206.

Van Vught, Nicholas, 'Varying Treatments of Delayed Onset Muscle Soreness in Athletic Training', California University of Pennsylvania, 2005.

post signature

Twitter | Youtube | Instagram | Pinterest | Bloglovin
SHARE:

Friday, April 11, 2014

Fitness Friday: At Home Exercise Essentials

For the longest time, I have been unable to get to the gym. I either couldn't afford one, or there wasn't one close to me and let's be honest - if it's not within walking distance, I'm not going to go.
So I've amassed quite the arsenal of at-home exercise gear. Today I'm going to share with you my absolute essentials. Just because you can't get to a gym or workout class doesn't mean you can't effectively work those muscles at home.


at home exercise essentials


1. Foam Roller
This is absolutely essential for anyone who works out. It's basically a cylinder made of hard foam (there are different levels of hardness, as well as different sizes out there), and you roll on it to help release knots and sore muscles. I roll on my foam roller every single day because it feels just so damn good. 

2. Door Pull Up Bar
J bought one of these on ebay a few years ago, and I love it. It's so easy to quickly bust out a few pull ups and chin ups. The fact that it attaches to a door and is held up with tension means you don't need anything special or a lot of space to have one. 

3. Swiss ball
You can do so much with this bouncy ball of goodness. Using a swiss ball requires you to maintain balance, so your core will work pretty hard, even if you're not doing a core-specific exercise on it. For instance, use it to prop your feet up and do push ups. I love using mine to kneel on and try to hold my balance. 

4. Massage Ball
This spikey ball of torture is incredible at really getting into those knotted up areas. I love this for releasing tension I hold in my shoulders. This is a lot smaller than the foam roller so it can really concentrate on specific areas. This is one of those "hurts so good" pains. I also really like it for sitting on when you get that intense burn from too many squats. 

5. Dumbbells
These are awesome because they take up practically no space. We have two 3.5kg ones and I love them for conditioning exercises for my shoulders and arms. You can do so many different exercises with these, that target almost every part of your body. Get a couple in different weights and you've practically got your own at-home gym. 

6. Resistance Band
These come in a couple of different tensions, usually noted by what colour the band is. Basically they're a really tight bit of elastic. I bought one from Rebel that came with a door jam, so I can use it for more exercises than just lunges. I also use it wrapped around my pole or clothes line to do rowing exercises. Again, this little bit of rubber can be used for so many different exercises that target so many different parts of your body. 

7. Yoga Block
I bought two yoga blocks for a couple of dollars on ebay - these are literally just blocks of foam so you really don't need to fork out a lot of money for them. If you're new to yoga or stretching it can be really helpful to use a block as an aid. Some purists are really against using aids, but I think there's absolutely nothing wrong with using them if you need it. You're much better off using an aid and getting the full benefit of a pose, than not being able to do the pose properly at all. 

8. Skipping Rope
I love my skipping rope for quickly fitting in some cardio for a warm up. If you can't get to the gym to run on the treadmill, and you don't like running in the streets, a skipping rope could be your answer! There's also something fun about revisiting something you used to love as a child. Skipping really requires nothing before you begin so it's a great exercise to do regardless of your current fitness level. 

9. Yoga Mat
I love my mat for stretching on. Carpet is slippery, and my house is full of it, so I find the sticky-ness of a yoga mat really helps me hold stretches longer. I don't have room at my place for a designated 'exercise area', so rolling out my yoga mat really helps me to get into the exercise frame of mind as well. Yoga mats are not absolutely essential, so if you feel you're doing fine without one you don't need to rush out and buy one. I just find that it helps increase my level of comfort when stretching. 


What essentials do you use when working out at home? 

post signature

Twitter | Youtube | Instagram | Pinterest | Bloglovin
SHARE:

Friday, March 14, 2014

Fitness Fridays: Making Time for Exercise


There's no doubt that everyone seems to be pretty time-poor these days.
Whether it's technology that's to blame, high expectations of ourselves an inability to say "no", or a million other reasons...time can be tricky to manage.

At the moment, I'm pretty busy. I'm studying full time, in my last year of a double undergraduate degree. I also work part time as a manager in a retail store, and I'm working part time in a law firm. This leaves me with no days off until mid-April, when (thankfully) my work-load will lessen. I'm one of those people who struggles to say "no", and I cram so much into my days. I like to think though, that I do this without burning out. Once upon a time I didn't think too much about what consequences keeping so busy had on my health, but today I'm hyper-aware of it.
Keeping active is incredibly important to me, and something that I really enjoy so I try to make time for it.

So these are my tips for making time to exercise.

1. Write everything down.
I schedule in every single activity in my day. Every hour, every minute (within reason) is scheduled. This allows me to see where I have a couple of hours here and there as breaks. Even if I don't have hours, I have minutes and those minutes can add up to hours. Being aware of this time is the first key, I think to using time wisely. Which brings me to my next tip...

2. Multi-task when you can.
If I have 40 pages of reading to do for class, I'll get that done on the train to uni. I spend about 4 hours every day travelling to uni, and if I didn't recognise that I had that 'free time' it would get wasted. Using up these dead minutes and hours in my day means that it's one less thing I have to do when I get home, which leaves me with more free time at home. An hour spent on the train reading frees up that hour in the evening, and I can use that time to stretch or go for a run.

3. Incidental exercise.
This is a big one. I walk to the train station every day, which all up adds about 40 minutes of walking into my day. This doesn't even feel like any time since it's broken up across the day into tiny increments. Put that coffee jar on the top shelf and suddenly you're adding stretches into your morning coffee routine. Get off the bus a stop early. Always take the stairs instead of the lift. I always try to do forward bends when I get out of the shower and my muscles are all warm. Rather than bending my knee when shaving my legs, I bend at the waist and stretch out my hamstrings. It all adds up!

4. Get up an hour early
If you set the task you least want to do as your first task of the day, then the rest of the day can only improve. Waking up and exercising in the morning means it's done and dusted for the day and you don't even have to think about it. It also means you're less likely to make up excuses!

5. Work out while you watch T.V.
This is really just more multi-tasking. We usually watch an hour of television while we eat dinner. After our meal, and some time to digest I always make an effort to stretch. That way I'm still spending time with J, still getting to watch T.V, and I'm fitting in a quick stretch session. You can add in crunches, hold planks, do push ups. You really don't need equipment to work out and watching T.V. is the perfect distraction from the hard work you're doing.

6. Make an Appointment
I add in half an hour to an hour of yoga into my week by making appointments to myself. I add them into my diary, and once they're written I can't cancel it. I'm the same with attending pole classes. That's an appointment that I've paid money to attend. So I can't miss it.

What are your best tips for finding time to exercise?

post signature

Twitter | Youtube | Instagram | Pinterest Bloglovin
SHARE:

Tuesday, June 11, 2013

Body Care: Eczema and Dry Skin


Winter is notorious for sucking any moisture from our skin. As we spend more time indoors with heating, and brave chilly winds, our skin takes a serious beating. I have dry skin to begin with, so winter is actually hell for me. (Despite this, it's still my favourite season)

SHARE:

Friday, June 7, 2013

May Favourites


As yet another semester of uni winds down, my life gets busier than ever. Unfortunately I haven't been deviating too far from a simple, day routine as far as make-up goes, so no new favourites in that department. I do have some great things to share, so grab a cup of tea (which btw, I've been loving T2's Creme Brulee!) and have a squiz:
SHARE:

Thursday, May 23, 2013

How To: Apply False Eyelashes


FAR OUT I LOVE FALSE EYELASHES.
The first time you apply false eyelashes is really, really hard. It can be fiddly, confusing and frustrating.
As with most things in life, there is more than one way to do something. If you try out my method below and find out it doesn't work for you, then check out Michelle from Lab Muffin's here, because hers is slightly different to mine. This tutorial is just going to cover strip eyelashes. If there's demand for it, I might write up another post later about individual lashes.

So, strip lashes are always going to be too long for your lash line, and you'll need to trim them first. I usually just use a pair of nail scissors for this part. Take the lashes out of their packet, and hold them up to your upper lash line. Unless you're Asian, you want them to end about half a cm in from your natural lash line, so that's your trimming point. Always trim from the end, and not the inner part, because the lashes on that side are generally shorter.

Also - applying false lashes is the LAST part of your eye makeup routine.


So all you need is the lashes, some glue and some tweezers. I personally prefer Duo glue, they have one for sensitive eyes (above) and a standard one as well. I find it dries quickly, doesn't irritate my eyes and the best part is it has a brush-on applicator, which makes it really easy.


Picking up the eyelashes with your tweezers, lightly brush on a small amount of glue onto the lash line. As you can see in the picture above, you only need the tiniest amount - in fact, less is definitely more in this case.

The most common problems people have with applying false eyelashes is applying too much glue and not allowing it to dry. Think of it this way; you can always apply more quickly if you haven't applied enough, but you'll be waiting longer (and may even need to start over) if you apply too much. So a light coat is all that's needed. Give it about 10-15 seconds to dry. Sometimes waving the lashes in the air can make it dry a bit quicker. I know this is counter-intuitive, but when it dries it will be a tacky consistency, which will help them stick to your eyelid better. If it's still too wet, it won't be able to stick and will slide around on your eyelid. FRUSTRATING.


Position the eyelashes in the centre of your eye - like I mentioned earlier, you want the end to be about 0.5 cm in from your natural lash line so it doesn't drag down your eyes. Disregard this part if you're Asian though - generally Asian eyes have a straighter lashline, so the lashes won't droop. 


So I usually stick the middle part down with tweezers and then once they're positioned, stick the inner and outer ends down with my fingers. Gently pressing them together with your natural lashes will make them blend in a bit more, and help you get as close to your lashline as possible. 

It's really that simple! Repeat for the other side (obviously) and flutter, flutter away! 

So now I ask you guys; 
What's your best "applying false lashes" trick?

post signature

Twitter | Youtube | Instagram | Pinterest | Hellocotton | Bloglovin


SHARE:

Sunday, March 24, 2013

How To: Silky, Soft and Smooth Hands


How's that for alliteration?
As a pole dancer, I fight really hard to get rid of the gross callouses that grow on my hands. and have developed a routine to help keep my hands soft and silky smooth.
These tips work well if you use your hands a lot in your day to day life. Whether your hands are roughed up from sport or a hobby such as gardening, never fear!


As much as I love hand creams, I cannot use them on the days I have pole because that's downright dangerous. So I have to turn to other methods. On the days I pole I always make sure to wash off my grip aid really well so it doesn't continue to dry my hands out for longer than absolutely necessary. That night in the shower I'll exfoliate the skin on my hands with a pumice stone
I got mine from Target and I absolutely love it because it has a little rope to hang nicely on my shower caddy, and it's got a rubber grip all the way around so it's easy to hold even in running water.

My next favourite thing is this callous shaver from Revlon. Once a fortnight, while my skin is really soft after my shower, I'll gently shave off the callouses at the base of my middle finger. (gross, right?) If you've never seen one of these before, they're actually designed for feet. Be careful though, because it is a razor blade you're using so you don't want any nasty cuts that could possibly get infected.


In between pumice and callous shaver treatments, I'll use some of Crabtree & Evelyn's Hand Recovery, usually once a week. This is basically like a scrub for your hands; it deep cleanses, exfoliates and moisturises all in one 60 second treatment. With awesome natural ingredients such as sea salt for exfoliation, algae, macadamia nut oil, and shea butter for moisturising and lavender oil for soothing, you know it's going to be good. The La Source one has a nice sea air scent too, which is quite refreshing.

Every night that I'm not poling, (or very early in the mornings on the nights that I plan to) I'll usually apply a hand cream. I love both the Crabtree & Evelyn Avocado hand therapy (review here) and the Body Shop's Almond Oil Hand Rescue for deep moisturising.

And that's it! My hands remain soft and supple for day-to-day activities whilst not being too slippery for poling!

What are your favourite hand remedies? Are you a hand cream lover or are your hands ignored in your beauty routine?

post signature

Twitter | Youtube | Instagram | Pinterest | Hellocotton | Bloglovin
SHARE:

Friday, March 15, 2013

Oh Google, what an outcry you have caused!


You may (or may not have) heard that Google are closing down Google Reader, apparently due to lack of use.

There have been many articles and tweets expressing annoyance over the past 24 hours about this, and a petition has even popped up to save it. There has also been a bit of confusion about whether GFC is going away too.
In about June last year, Google took away GFC for non-Google related blogs (so for instance if you were hosted on Wordpress, you could no longer use GFC). Their blog doesn't say anything about GFC going away.
Google are not a stupid company - I believe they're trying to make people move across to Google+ (eurghh) but they would announce if GFC was going too, surely? They're not going to piss people off for no reason.

Anyway, if you are a a Google reader user and lover you have until July 1st to find some alternative RSS readers. So check out the list below for alternatives and places to find me:

RSS Readers:


NewsBlur
If you used reader for more than reading blogs, then NewsBlur is a great RSS reader, available on computers, ipads, iphones and android devices. To make it even easier, Mashable have a great article on how to export all your RSS feeds from Google Reader.

If you use Microsoft Outlook, you can also subscribe to RSS feeds on there.

RSS readers are really easy to find - take a look around the web to find one that best suits your needs.

Blog-following alternatives:


Hellocotton
I love how easy it is to find other blogs on Hellocotton, and the layout is really easy to follow and read. Follow me here.


Bloglovin'
One of the blogging communities' favourite blogging readers for quite a few years. I'm sure Bloglovin are loving all the extra traffic they're getting. With an easy to use interface and a sleek design, I love this site. There's also a great extension for Chrome that shows you how many unread blog posts you have to check up on! Unfortunately, I have noticed over the last 24 hours the site crashing a bit - probably due to the extra traffic. Hopefully they can update their servers to handle the amount of users they'll surely get. 


 Twitter
Not the easiest method to keep track of all the blogs you follow, but it can be done by using the 'lists' function.  Most bloggers tweet to advertise their latest posts, so you can easily go straight to their page from there. Follow me: @michaelaarghh

CBF?


You should be able to continue to read blogs straight from your dashboard if that's what you already do. When you log into blogger, notice how to the top right of your "reading list" is the option to "View in Google Reader"? That means that by going through the reading list, and clicking on the individual blogs to read, you're not using Google Reader.

Are you happy or sad to see Google Reader go? What are your plans for reading up on blogs come July 1st?

post signature

Twitter | Youtube | Instagram | Pinterest | Hellocotton | Bloglovin
SHARE:

Thursday, March 14, 2013

My Week in Pictures #26


I went back to Uni last week, was late to buy my textbooks and already I'm behind on my readings. It is for this reason that I'm also behind on blogging. I swear, I'm just trying to work out a routine. I thought I'd be able to get two posts up today, but after getting home at 9.30 from my second job, then having a shower and sitting down for half an hour the night's already mostly escaped me. I'm not going to make promises for this week but my aim is to go back to posting every day (except Sunday). I have a stack of posts planned out, it's just trying to find the daylight to photograph for them that's keeping me from posting.

So to my new followers; please stick around. I am usually a much more dependable blogger than this.
To my old followers; thanks for still coming by to check me out. My organisation is shitty at the moment and that's not really an excuse. But I'm sorry. 

My apologies if you follow me on Instagram as you may have already seen those photos, but this is what I got up to this week:


Playing this and reading this. I have Tomb Raider to thank for my love of games; when I was really young my mum used to play the original TR, and I'd watch and if I was really good she'd let me have a turn. I've played every TR game that has come out, and loved them all most of them. This one is actually really amazing. Amazing graphics, amazing story, amazing fun. I've only played it once (again...the whole I-have-no-time thing) but I love it, and am dying to get back into it when I have a spare hour or two. 

A Clockwork Orange has been keeping me company on the train to uni. I'm only a few pages out from the end and am really enjoying it. It took me a while to get into, because it's a strange style of writing and there are a lot of made-up words (ETA: One of my instagram followers has informed me the words are actually Russian slang, not made-up words) which take some time to learn but overall it's a good read.


I went and visited my mum and little brother (although he's not so little anymore!) this weekend in QLD. To say I miss them is an understatement. We spent lots of time together, ate lots and talked heaps. Mum bought my little brother a puppy dog for his birthday (see above!). He's just the cutest, tiniest little fluff-ball. He's a shnoodle, which is a shitzu x poodle and his name is Charlie.

My little bro and I went out for a walk, and I made him snap some street pole shots for me...


Bonus points for creativity with that tree? I thought it was funny. 

I was actually quite busy last week, with lots of meeting up with friends and running around. I unfortunately didn't take many photos of my escapades. That being said, I have a new phone now. It's a lot quicker than my old one and actually takes decent photos. So I'll be able to bug even more friends when we go out for coffee. (pleeeease, just one more shot of your coffee!)

How do you deal with your routine changing? Hopefully a lot better than me, which is to freak out and cry to my boyfriend about everything I have to do, rather than actually do it.

post signature

Twitter | Youtube | Instagram | Pinterest | Hellocotton | Bloglovin
SHARE:

Tuesday, March 5, 2013

Back to Uni Fashion Essentials!

Whether you went back to uni this week or last week it's a good excuse to update your wardrobe with some 'back to uni' essentials. ASOS has a massive collection to choose from, and all at a student-friendly budget. I've picked out some bits and pieces that I love and consider essentials. Even better is that every piece here is under $60! With free delivery (and returns) you can't go wrong!

cardis and jumpers
note that clicking on the images will take you to Polyvore. From here you can click the individual items and they will take you to ASOS, where you can buy them :) 

Even on warm days, a cardigan or a light jacket can be absolutely essential. I know at my uni that some lecture halls have air con that's permanently set to "freezing", so a lightweight jacket that I can throw in my bag is much appreciated. I love the waterfall cardigan for a super casual, comfy look. Smarten up the look with a blazer - added studs keep it on trend. I'm also of the very strong belief that every girl should have at least one leather jacket in her wardrobe. 

Pants and Dresses and Shorts, oh my!

For the most part, comfort is the first thing I think of when getting dressed for uni. That being said, I appreciate clothes that are comfy and stylish. ASOS have an awesome collection of shorts (I'm totally into vertical stripes at the moment...like my legs needed any more length to them). Printed pants are very on trend at the moment. What I love about the pants above is that they're all pretty unique, so it's really easy to find your own personal style; personally I think that those metallic baroque pants are freakin' awesome.
And of course, I really can't go past an easy, everyday dress for those mornings that I really cbf getting ready. (frugal tip: If, for example, $60 seems a bit much to pay for a dress, then halve the cost in your head. Because technically you're only paying $30 for the top and $30 for the skirt!) Match with some flats or boots, throw on a cardi or jacket and BOOM instant style. Too easy.


shoes asos

I think it's pretty common sense to wear flats to uni. You're walking between the library and lectures and tuts. Most campuses are pretty big and the last thing you want is to be battling blisters or sore feet from heels. Boots are great for winter... I love the cream biker boots with studs. The red and white polka dot flats are instant cute when worn with jeans, and those Maisy loafers add a "grown up" element to any outfit. And some days, you just want to wear sneakers (especially if you have a really long day). ASOS have a heap of different styles so you'll definitely find something that fits with your wardrobe!

What are / were your uni fashion essentials? Are you the type to rock up in leggings and an oversized shirt or do you prefer to put effort in? Or does it really depend on the morning?

Disclaimer: I was asked to write this post on behalf of ASOS. They have in no way influenced this review and all opinions are my own. See my disclaimer for further details. 

 
post signature

SHARE:

Tuesday, February 12, 2013

Review and Swatches: Inglot Blush Palette

I've been talking about this palette a lot lately - mentioning it in both the "6 products I could not live without" and my "January Favourites" posts. Considering I chose these shades online without trying them out in person, I think I did really well. Normally priced at AUD$16, I got them on sale for $12.80 each. 

48-68-30-37

Here's a closer look at the colours I got, with each number. It's quite annoying that Inglot uses numbers instead of names (although I can imagine it would be easier for them). It's difficult to remember numbers, and the blush pans don't come out of the palette as easy as the eyeshadow pans do. The first three blushes are all matte, with 37 being a shimmer colour. 

48-68-30-37
Swatches with flash off. 
48-68-30-37
Swatches with flash on. 

I absolutely adore the first three colours - 
I think 48 (far left) is perfect for that rosey "just went running in the cold" flush - I can see myself getting a lot of wear out of this one in winter. 

68 is a really beautiful, slightly coral colour, and one I've been getting a lot of use out of lately. I feel like this is a colour that would suit most skin tones (surprisingly - I've never seen myself as a coral kinda gal)

30 is a matte peach colour - I haven't had that much wear out of this one yet. 

37 - The SHIMMER! I was really overwhelmed when this one arrived in my mailbox - I didn't even realise it was a shimmer when I bought it. As you can see in the above swatches though, the shimmer is not that crazy on the skin, and I actually really like it. I first thought I'd use this one mostly as a highlighter, which is what I've done so far - but I think I'd be game enough to wear it on my cheeks. 

As far as pigmentation goes - watch out cheeks! These blushes are incredibly pigmented, and a little really goes a long way. I apply with my Real Techniques stippling brush, making sure to pat off the excess product. If I've applied too much, I normally blend out the colour with some setting powder and my Real Techniques powder brush.


I really think Inglot have hit the nail on the head as far as packaging in their freedom system goes - the palettes are incredibly sturdy, lightweight, with a top that allows you to see what's in the palette. The lid snaps on with strong magnets, which also comes in handy if you have more than the one palette. As you can see in the above photo, the palettes can be stacked up together - perfect for travelling and saving space. 

Single blushes from Inglot retail for AUD$22-$28 for 2.5g. 
These blushes are $16 for 7g; kind of amazing value. The palette retails for AUD$20, or if you have a z palette (or similar) you could just use that. 

Have you tried Inglot blush before? What's your best blush tip?


post signature

Twitter | Youtube | Instagram | Pinterest | Hellocotton | Bloglovin

SHARE:
© Where is my mind?. All rights reserved.
Blogger Template by pipdig