Trending

Saturday, December 14, 2013

Skincare Tips: Blackheads vs Sebacious Filaments

Have you ever gazed into one of those magnifying mirrors...or even a regular mirror...and been well and truly disgusted by what looks like a huge amount of blackheads covering your schnozz?
Have you ever used a pore strip on your nose, and been incredibly satisfied when inspecting it post-rip off, to find heaps of slimy little buggers embedded there?

Well...what I'm about to tell you will blow your mind. No, those are not blackheads on your nose. They are sebacious filaments. Everyone has them, they are never, ever going to go away and you're doing more harm than good worrying over them.

What is a sebacious filament?
Wikipedia's definition summed it up in a nutshell, so I'll just copy+paste that right here: "sebaceous filament is a tiny collection of sebum and dead skin cells around a hair follicle, which usually takes the form of a small hair-like strand". They allow the sebum a path from the pore to the surface. Basically, they are oil glands. Not so gross, right? 

The most comforting thing is that...
Every. Single. Person has these. And, in my experience, once you stop attacking and extracting them, they stop being so inflamed and you tend to notice them a whole lot less. 

How do I know if they REALLY are sebacious filaments or blackheads?
The general rule of thumb is that if they are the same size and shape as every other one on your nose / face, then it is most likely a sebacious filament. If it's bigger or a different shape than the others, it's most likely a blackhead. Also, blackheads are generally a lot darker than sebacious filaments. 

How do I get rid of them? 
Well, like I mentioned, you can't actually get rid of them. They actually form part of your skin. You can however, kind of un-clog them. To do this, you'll need to use chemical exfoliants, for example, fruit acids, or an AHA solution. Trying to squeeze them out, or using pore strips or any other irritating, harsh products will only irritate your skin and make them more noticeable. 
Sebum is only darker in colour once it oxidises (gets exposed to the air). By using harsh products and squeezing and pore-stripping you can actually damage your pores, make them larger, and create a larger surface area for the sebum to be exposed to the air. Thus, making them darker. You can also try treating the skin with benzoyl peroxide, which will lighten them and make them less noticeable. 
Of course, make up is also an option to hide them! 

post signature

Twitter | Youtube | Instagram | Pinterest | Hellocotton | Bloglovin
SHARE:

Monday, July 8, 2013

Review and Swatches: Rimmel Apocalips Lip Lacquers


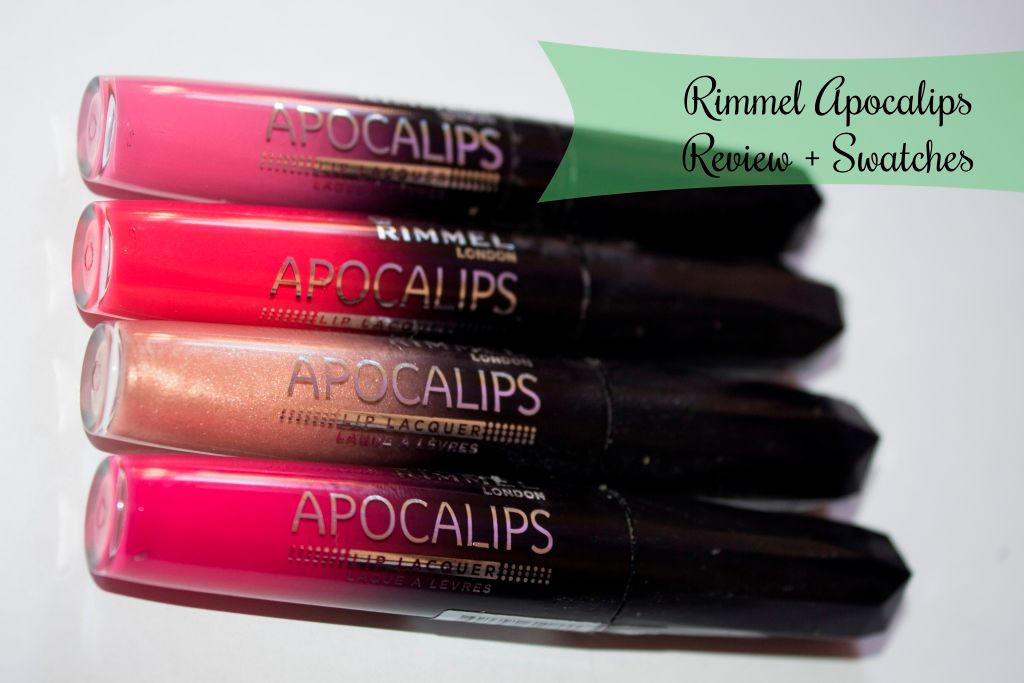
I can not even tell you how long I have spent trying to source these from England. No, I can. About 6 months. 6 long months, I have been waiting and waiting for these to become available. FINALLY they are in Australia! I picked these four up recently in Priceline, from memory they were about half price. I believe there's 8 in total, but my local priceline only had half of them stocked. Bummer!
I love the name of these lip lacquers...I'm a sucker for a good pun, and Rimmel have continued the theme through the naming of the shades, which I totally respect.


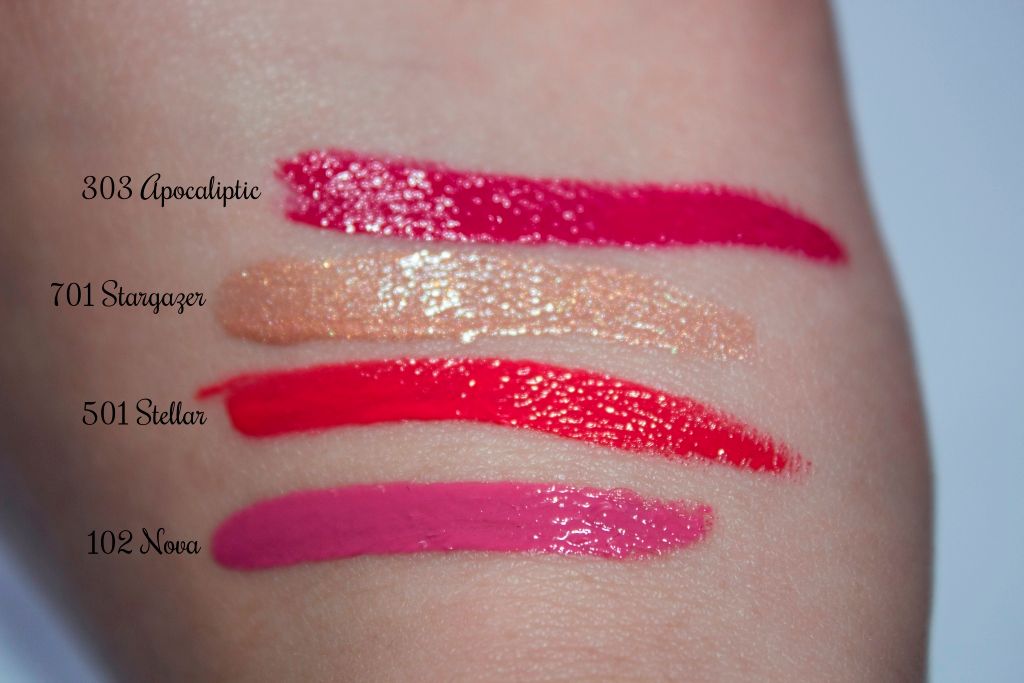
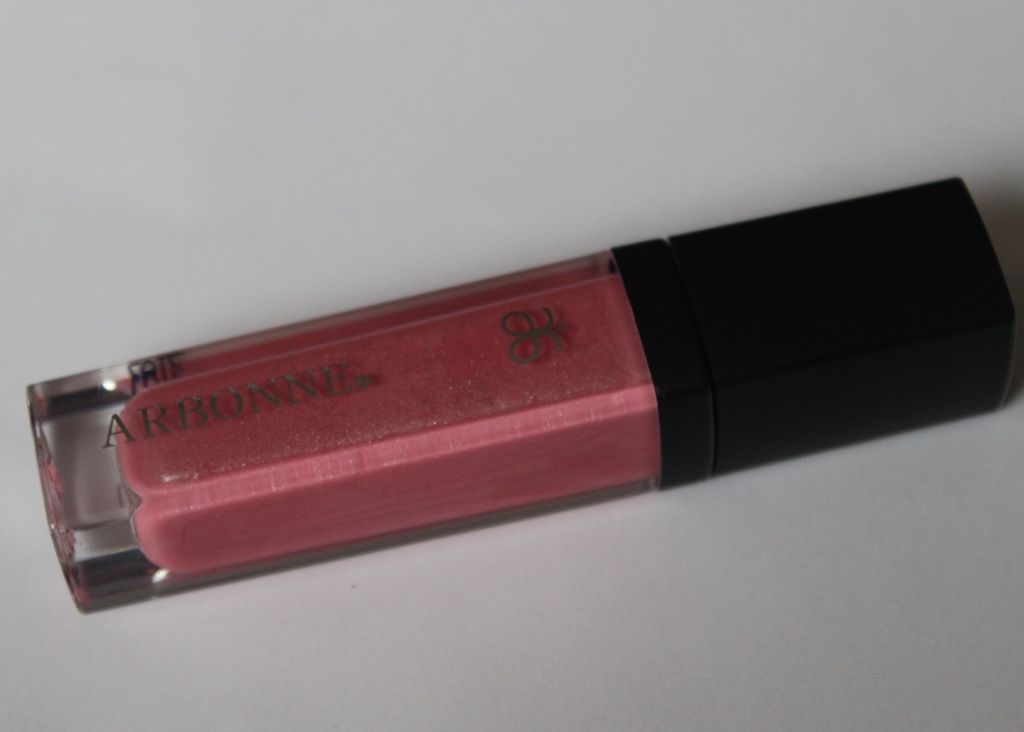
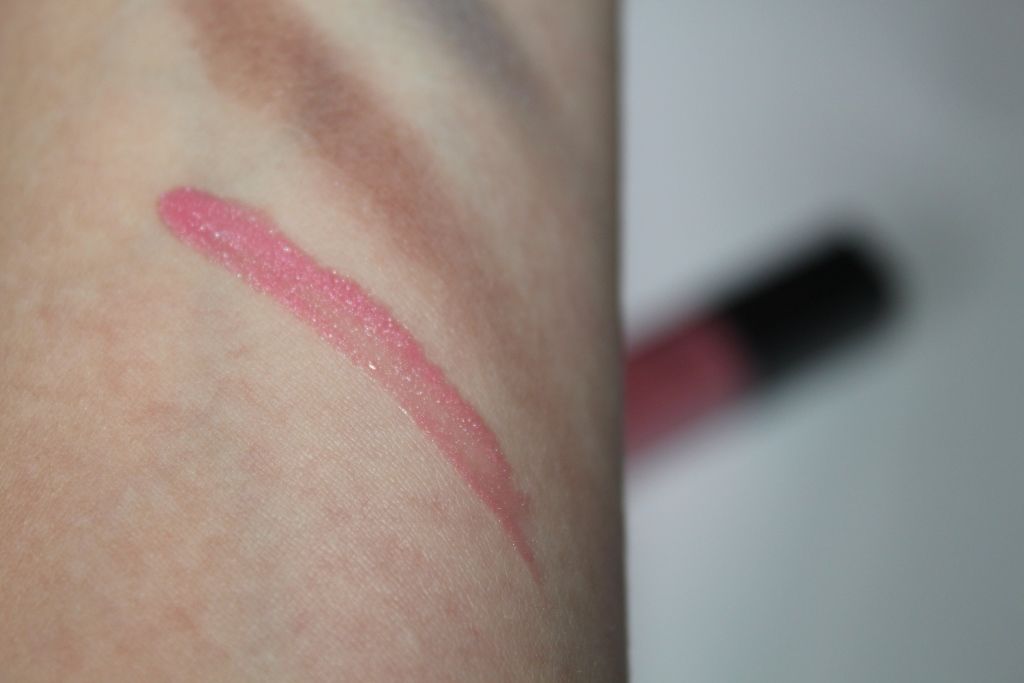
HOW INSANE is the pigmentation in these? That is literally one swipe of product, onto the back of my hand. 

Before we get into the nitty gritty, I will comment on the packaging, like I always do. Quite frankly...I love it They lip lacquers are sturdy, they look cool; the lids are prism-y and kind of crystal looking. Again, dedication to a theme; I totally approve of and respect this. I also love how the bottoms are clear, so you can see the colours without having to search for the names of each shade. I also love that the colours displayed on the packaging are pretty true to the colour of the product. It makes it so much easier for me to decide in the mornings on a colour to wear. 

I love most of the colours I picked out; 
Apocaliptic is a beautiful deep berry, which I'm absolutely loving for winter. 
Stargazer is a gold coloured nude with a heap of glitter in it. Don't love this one on my lips to be honest...it takes a while to blend out into something wear-able. 
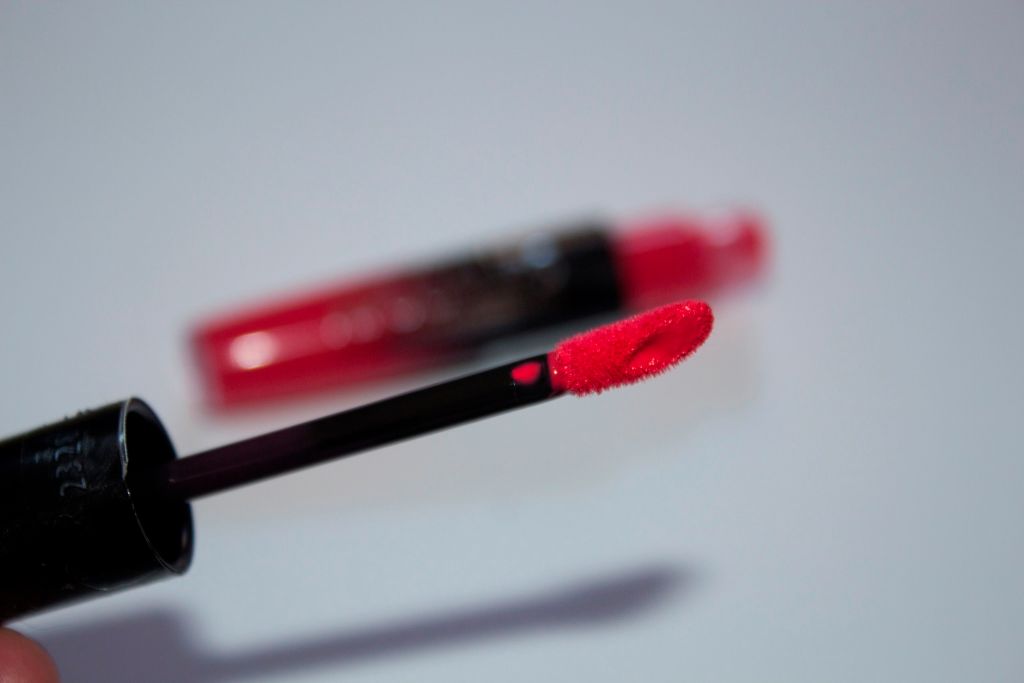
Stellar is a cooler-toned red; if you're into corals you'll love this one. It almost seems to have a pinkish base to it too, which is nice. 
Nova is a really pretty pink and I actually like this one a lot more than I thought I would. 

All of the colours dry easily on the lips and the staying power is a couple of hours, less if eating and/or drinking. To be honest, I was slightly disappointed with how long they last. Considering the amount of colour you get in a swipe of product, I expected it to really cling onto my lips and hang out there for a while. I did have to re-apply several times throughout a 9 hour day, with the colour fading off the inner part of my lips first, leaving that ugly ring of lipstick. 

The formula of these is really creamy, albeit quite thick. I personally have found this makes it a little tricky to apply, but I'll get to my tips for that later. 

The scent of these probably won't be to everyone's taste. If you're one of those people who can't handle weirdly scented lipsticks, you'll probably want to avoid these, and in particular Stargazer. I noticed that one had the funkiest smell of all of them. I can't even really describe the scent...it's like cheap, synthetic plastic.


The lip lacquers come with a doe-foot applicator. Honestly, I think the formula is way too thick and wet to apply with one of these and ends up quite messy-looking; especially the darker shades. 
I've found the best way to apply these is by swiping some product on the back of my hand and then applying with a lip brush. This allows for a far more prescise application than you could possibly get with the built-in applicator. If you're in a situation where you don't have a lip brush, just make sure you scrape off any excess product onto the rim of the lipstick and start off with a small application and build up. This is one of those lip products you NEED to blot with, otherwise they will never dry on your lips, and will slip and slide like nobody's business. 
Also; make sure your lips are nicely hydrated and have been exfoliated before you pop some of this on... I didn't do that when I swatched these onto my lips, and as you'll see in the below photos, this is one of those products that clings to the dry patches. 

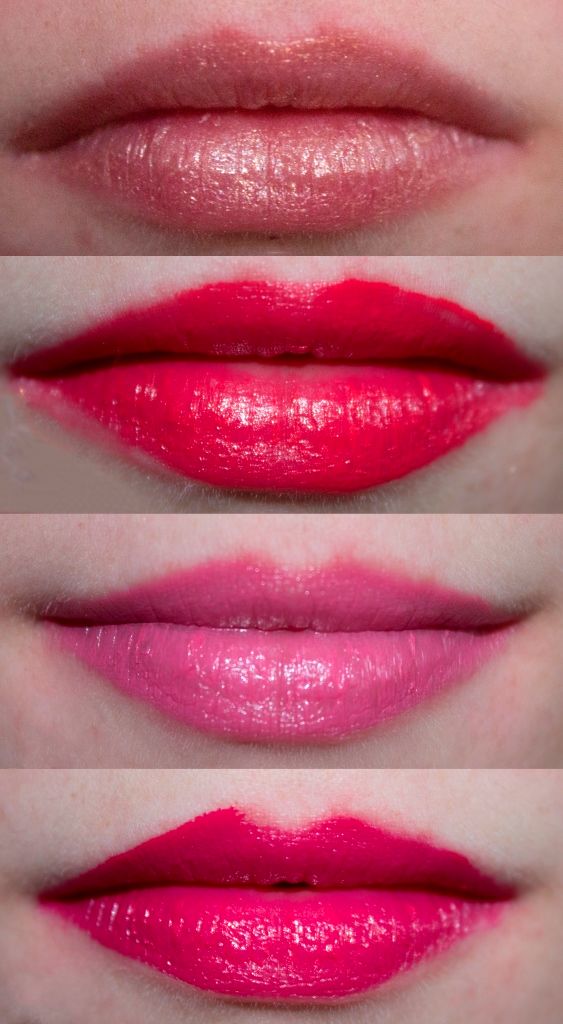
Top-Bottom: Stargazer, Stellar, Nova, Apocaliptic

The above photos were all taken with the exact same lighting conditions, and applied with the doe-foot applicator. You can see in the first and second swatches where the pigment has grabbed onto my dry patches. You may also notice that the application of stellar and apocaliptic is slightly messy. Like I  mentioned earlier, this can easily be avoided by using a lip brush, but as long as you have a tissue and some make up remover on hand, you'll be fine either way. From normal standing distance, I doubt anyone would really notice the application is less than perfect. 

Overall, I love the colours of these. I think they are fantastic for a liquid lipstick, and I may go purchase the other four shades if I can track them down. This is quite a high maintenance lippy though, so if you're not into that I'd give it a miss. If you love beautiful coloured lips regardless of what it takes, then this is the product for you! 

Have you tried these out yet? Is liquid lipstick something you're into?


post signature

Twitter | Youtube | Instagram | Pinterest | Bloglovin
SHARE:

Thursday, May 23, 2013

How To: Apply False Eyelashes


FAR OUT I LOVE FALSE EYELASHES.
The first time you apply false eyelashes is really, really hard. It can be fiddly, confusing and frustrating.
As with most things in life, there is more than one way to do something. If you try out my method below and find out it doesn't work for you, then check out Michelle from Lab Muffin's here, because hers is slightly different to mine. This tutorial is just going to cover strip eyelashes. If there's demand for it, I might write up another post later about individual lashes.

So, strip lashes are always going to be too long for your lash line, and you'll need to trim them first. I usually just use a pair of nail scissors for this part. Take the lashes out of their packet, and hold them up to your upper lash line. Unless you're Asian, you want them to end about half a cm in from your natural lash line, so that's your trimming point. Always trim from the end, and not the inner part, because the lashes on that side are generally shorter.

Also - applying false lashes is the LAST part of your eye makeup routine.


So all you need is the lashes, some glue and some tweezers. I personally prefer Duo glue, they have one for sensitive eyes (above) and a standard one as well. I find it dries quickly, doesn't irritate my eyes and the best part is it has a brush-on applicator, which makes it really easy.


Picking up the eyelashes with your tweezers, lightly brush on a small amount of glue onto the lash line. As you can see in the picture above, you only need the tiniest amount - in fact, less is definitely more in this case.

The most common problems people have with applying false eyelashes is applying too much glue and not allowing it to dry. Think of it this way; you can always apply more quickly if you haven't applied enough, but you'll be waiting longer (and may even need to start over) if you apply too much. So a light coat is all that's needed. Give it about 10-15 seconds to dry. Sometimes waving the lashes in the air can make it dry a bit quicker. I know this is counter-intuitive, but when it dries it will be a tacky consistency, which will help them stick to your eyelid better. If it's still too wet, it won't be able to stick and will slide around on your eyelid. FRUSTRATING.


Position the eyelashes in the centre of your eye - like I mentioned earlier, you want the end to be about 0.5 cm in from your natural lash line so it doesn't drag down your eyes. Disregard this part if you're Asian though - generally Asian eyes have a straighter lashline, so the lashes won't droop. 


So I usually stick the middle part down with tweezers and then once they're positioned, stick the inner and outer ends down with my fingers. Gently pressing them together with your natural lashes will make them blend in a bit more, and help you get as close to your lashline as possible. 

It's really that simple! Repeat for the other side (obviously) and flutter, flutter away! 

So now I ask you guys; 
What's your best "applying false lashes" trick?

post signature

Twitter | Youtube | Instagram | Pinterest | Hellocotton | Bloglovin


SHARE:

Tuesday, April 23, 2013

Review: Arbonne Cosmetics*


Arbonne is a Swiss company, mostly known in the beauty community for their skincare range. I'd heard a little bit about them on youtube, but never much from this side of the pond. I was asked if I'd be interested in trying out some of their cosmetic products, and after checking out the company, I absolutely was. Arbonne's products are based on botanical principles; products that are going to highlight your natural beauty whilst remaining safe and beneficial for your skin. 


Perfecting Liquid Foundation with SPF 15
I'm very, very fussy with foundations. I like something that is going to give me a fuller coverage and even out my skin-tone without being heavy, yet is going to last me all day. I was sent this in the lightest shade, 'Alabaster'. Unfortunately, the problem with matching someone's skin-tone on the computer is that you're probably not always going to get a match. This colour is quite lighter than my natural skin tone, which is unfortunate. I had the idea of mixing it with a darker tinted-moisturiser I have sitting around but decided that wouldn't be fair for the review. So, the first day I wore this without mixing it, and without bronzer. I looked way too pale, but it held up really well! It lasted a 13 hour day at uni without any need for re-application. I felt that it applied really nicely, and wasn't drying on my skin. This product also contains no parabens, phthalates or talc. 

The second day I wore this I brushed some bronzer over my entire face with a powder brush, which brought the colour closer to my natural skin-tone; this seemed to do the trick! I absolutely love this foundation; it's non-comodogenic, it increases the moisture content of your skin and the finish it gives my skin is just beautiful. I also really love the packaging; the glass bottle has a really luxurious feel to it, and I love that it has storage instructions AND a use-by date written on the glass. Genius. 
RRP: $55.00


Mineral-Infused Eye Shadow
I got two eye shadows, in the colours "Cabarnet" (left) and "Blue Slate" (right). Both of these colours are quite pigmented, without being too intense. They're easily blendable and  go well with most colours I already own. I love Cabarnet for a muted, day-time look, whilst Blue Slate provides a really beautiful pop of colour. Arbonne eye shadows are currently available in 20 shades, and all are infused with anti-cakeing agents, such as Zinc Stearate, to ensure that colour remains smooth and even. 
RRP: $26.00


Lip Polish in Posh
To be honest, I've never really been much of a lip gloss girl. Whilst I love the idea of shiny, sexy lips I absolutely cannot stand stickiness. And I actually can't believe it, but this product has lived up to its claims of shiny but not sticky. The applicator is quite similar to most lip glosses, and when I saw it I was kind of scared...hoping it would not be like every other lip gloss product that just leaves me furiously rubbing at my lips with a tissue. Oh how pleasantly surprised I was! The colour is quite a feminine pink, that definitely leaves my  lips with a nice sheen (which I feel is the grown-up version of shiny). As for how it feels? Ridiculously moisturising and super smooth. It feels more like a lip balm than anything, and I LOVE that. 

Here's a swatch for colour purposes:


The lip polish is available in seven shades, with key ingredients including wild mango butter, sunflower oil, vitamins A and E. Like the previous two products mentioned, it's also completely free of parabens, phthalates and talc. 
RRP: $36.

Check out Arbonne Cosmetics for yourself here.

Are you a lipgloss girl? How do you make the wrong colour foundation work for you? Give me your tips - it would be a shame to let this go to waste!! 

Disclaimer: These products were sent to me for consideration. This has in no way affected my opinion of them, nor has Arbonne Cosmetics influenced this review.   For further details, please check out my disclaimer

post signature

Twitter | Youtube | Instagram | Pinterest | Hellocotton | Bloglovin
SHARE:

Saturday, March 16, 2013

My Desk-Essential Beauty Items


With blogging, uni work, and general catching up on emails, it's really not a surprise that I spend a LOT of time at my desk. As such, I try to make it an area that is not only functional, but comfortable. Keeping a stash of essential beauty items on one of my shelves helps accomplish this. 


I used to keep all this stuff in a small gift box, but when my friend Meg gifted me this glass container for Christmas, I immediately switched. It actually ended up saving me space because it's tall, so fits more in. Also, because it's see through, I find that I reach for the items more frequently. 

So what exactly do I keep within reach?


Hand Creams
I'm such a hand cream addict, and am so weird about keeping my hands soft and smooth. Maybe four hand creams to have within reach at any one time is slightly excessive? To be fair, I do occassionally switch these ones up with whatever one is in my handbag for something different. 


Body Shop Almond Oil Hand Rescue and Hand and Nail Cream. I prefer to use the hand rescue cream at night, when I've finished studying and am about to snuggle on the couch or jump into bed. The hand and nail cream sinks in really nicely, so I use that as a more general hand cream during the day. 

Say it With Scent Vanilla Hand Cream: Another light hand cream, I use this one when I'm bored. It does moisturise well, although I wouldn't say it's an 'intense' moisture surge. I love the scent of this one (surprisingly, since I'm not normally a vanilla kinda gal). 

Crabtree & Evelyn LA Source Hand Cream: I've done a whole video reviewing this, and it is still one of my favourite, go-to hand creams. I absolutely love the scent, the texture...basically everything about this one. 

Lip Balms and Scrubs

Maybelline's Baby Lips: No really, what can I say about these that hasn't already been said before? I love them. 

Blistex Complete Moisture: I really think this is one of those non-negotiable, everyone-should-own-this products. No really, EVERYONE. Including the boys. I love the SPF in this, and I love the way it treats my lips if they do get burnt, or are dry and flaky. 

Speaking of dry and flaky...


LUSH lip scrub in Popcorn and Sweet Lips: Yeah, I'm one of those gross people that lick this off after using it. My argument is, it's my own dead skin cells and you probably inhale a million anyway, so a few more can't hurt. These are really yummy, and are a good exfoliation. I find that by keeping these next to my desk I'm more likely to use them than if they're in my bathroom. 


Face Masks

Apivita face masks; express beauty with cereals and express beauty with ginko biloba: Again, I find I'm much more likely to use these if they're in my line of vision constantly. I try to use a face mask at least once a week, and since I don't always get a heap of free time, I'll usually have one on while I'm blogging or assignment-ing. 

Tea Samples

Just because they're delicious, and I'm running out of room in the kitchen to store these. 

Other Misc Beauty Items

Antiseptic Ear Care Spray: Sometimes my piercings will play up - especially if I've knocked one of them on something. It's always a good idea to keep one of these handy. 

Pure Therapy Intensive Moisture: This is a repair gel that provides intense moisture to very dry skin. I tend to break out in rashes when I'm stressed (sexy, non?) so I keep this at my desk to help with the inflammation.


What beauty products do you keep at your work / home desk? 

post signature

Twitter | Youtube | Instagram | Pinterest | Hellocotton | Bloglovin
SHARE:

Friday, February 8, 2013

Interview Tips Part 1: Hair and Make-Up

This is part 1 in a 3-part series on interview tips! I'm really excited to bring this to you guys, and hope that it'll be able to help some of you out. I've been on quite a few job interviews, and in my experience they're always stressful. 
So today we'll cover part 1 - hair and make-up. 


General Tips:
- The most important thing to remember is that you only do what makes you comfortable. If you don't normally wear make-up you don't have to feel that you must wear it to look presentable. As long as the image you're portraying is clean and professional you'll be fine. 

- Clean and professional is the ultimate goal here. Keep hair out of your face, and remember that this isn't the time to try out bold colours. 

This is how I did my hair and make-up for a job interview about 2 weeks ago (I got the job, YAY!). 
It was an 'informal' interview, so I did wear my hair down with my fringe pinned back. We will cover hair a little later, but just so you know. 

So for the eyes I used:
 
Maybelline Colour Tattoo in Bold Gold. Check out my review on this entire collection here. I used this as a base for my eyeshadow, and applied it all over the eyelid. 


For the eyeshadow, I used Half Baked (lid colour) and Buck (crease and outer corner) from the Urban Decay Naked Palette:
 

I then followed it up with a coat of Maybelline's The Falsies Flared in Blackest Black

I didn't bother with my eyebrows as they're quite dishevelled at the moment. (If anyone wants to donate funds to the Fix Michaela's Eyebrows Foundation that would be appreciated
I tied off the look with a nude lip.


Again, if you want a full review on the Revlon Just Bitten Kissable Balm Stain you can check that out here. Like I said earlier, you don't want to go with bold colours, so a nude lip works really well. This balm stain nourishes your lips quite nicely, with a hint of colour. 

So for the hair, you can either leave it out like I did, or if it's a more formal situation, try one of these easy-peasy up-dos using these:


Chic and sophisticated! For more tips and to see me actually doing my eye make-up, check out the video below. 


What are your make-up tips for job interviews? Do you prefer not wearing any make-up at all? How do you usually do your hair? 

post signature

Twitter | Youtube | Instagram | Pinterest | Hellocotton | Bloglovin
SHARE:

Friday, February 1, 2013

Hair Care Series Part Seven: My Routine

I get asked often in real life how I keep my hair so healthy while at the same time keeping it so blonde. Let me tell you; being bleached is never easy! Quick run-down of my hair history:

I started going blonde when I was about 15, with some highlights and foils at the hairdresser. I did this for about 2-3 years, until my lovely hairdresser moved to New Zealand (and I cried and threw a tantrum; NOW who is going to do my hair!?) She did such a great job, at such a great price and I was too scared to visit another hairdresser for colouring. So I turned to packet dyes to touch up my roots and all was well in the world. This ended up also being expensive. And I wasn't that good at doing it myself and ended up with weirdo patches. J asked me why don't I just bleach it because that's cheaper and quicker. Uhm, because it's scary, that's why. 

Anyway, I'm lucky my boy experimented with colouring his hair because he's done it for me ever since. 
So if you want me to do a post about bleaching your hair let me know and I'll happily comply. 

Now onto what I do to keep it healthy:


Shampoo
I only shampoo my hair about twice a week. Shock, horror. Your hair doesn't actually need cleaning that often, and is in better condition the less you strip it of its natural oils. Who woulda thunk it? 

At the moment I'm using Lush's Seanik and I love it. It contains salt for body and volume but the nori helps soften the hair as well. The lather of this one is really creamy, which I also like because I feel it's not as harsh on my hair (although it does still contain sulfates. Blah!) 


Conditioner
Every time I re-do my roots and wash the bleach out, I immediately put on the Sckwarzkopf Ultimate Repair Anti-Damage Mask, and let that soak in for a few minutes. I've been using this product for a few years, and have repurchased it many times. This mask is great value for money and I really like the 'deep condition' I get from using it. 

For normal conditioning, I use Tresemme's Moisture Rich Conditioner (in the blue bottle). I absolutely swear by this - my hair just soaks it up and it leaves my tresses smooth and shiny. 

As a 'special treat' for my hair I'll occasionally switch it up and also use the Organix Cocoa Butter conditioner. This one actually smells like chocolate (not like synthetic chocolate) and is really good at moisturising. It is a bit expensive though, which is why I tend to only use it sporadically. If I could afford it, I would buy/use this more often. 


Treatments
I am still loving Loreal's Elvive Extraordinary Oil and have done an entire review on it: here. So go check that out.
I've been trying out the Davroe Smooth Senses Straightening Balm when I blow dry my hair and I think it's doing a pretty good job at taming fly-aways.

For more info and general rambling, check out my video below.
Just a warning though that not only do I have chronic bitchface in the thumbnail, but I was slightly distracted that day - so not my best work. The general message still gets across though.


What are your holy grail hair products? How often do you wash your hair?

post signature

Twitter | Youtube | Instagram | Pinterest | Hellocotton | Bloglovin
SHARE:

Tuesday, January 22, 2013

Organisation Tips: Bathroom Drawers!

Our bathroom has absolutely zero storage in it. So when we moved in, we put in some old desk drawers to go under the sink. Not ideal, but it works for the moment. Or at least until we move.

I didn't really have an organisational system in place, and over time, the top drawer ended up being a dumping ground for everything and anything. Last weekend I decided I was completely over it and cleaned and re-organised.

Our bathroom is really cramped, so the first thing I did was take all the drawers out into my living room so I had some more space to work with. After I snapped the below photo I literally took all the products out. I laid everything on the floor and loosely grouped everything into categories. I'm very much a visual person so with this method I could work out the best way to store everything.


So this is what I was working with. From left to right, is top drawer, middle drawer and bottom drawer.
I decided that these drawers were going to be a place for excess product storage.
Here are the before and afters:

TOP DRAWER:


Before

The top drawer was the most convenient for me to throw things in that I use often, so I kept this in mind when deciding what to place in this drawer. I'm at my laziest at night time, when I just want to brush my teeth and jump into bed. I also have a lot of excess 'skincare' product, and so decided to dedicate this drawer accordingly. 

After

I didn't use drawer dividers for this one as all the products in here are bulky or in their own packaging anyway. I kept my toothbrush on top, closest to the front and the cotton buds in easy reach. Products I reach for less frequently were stored closer to the back. The great thing about these drawers though is that they aren't too deep so I'm not going to forget that I have things and never use them. 

MIDDLE DRAWER:

Before

This drawer is a little further out of the way than the top one, so it literally became a dumping ground for things I couldn't be bothered dealing with. Empty packets were thrown in here for later blog posts (I've never even done an empties post in my life), as well as other random bits and bobs. (You never know when you'll need some spare toothbrushes or extra gloves!) Knowing how I currently use this drawer, I decided to base it loosely around the same principle. 

After

This drawer became the place to store extra make-up and other misc items. Extra waxing strips and razors went in here, as did bottles for bath soak (I don't even have a bath....sigh) I used the packaging from an old Bellabox to keep smaller make-up items in and placed these towards the back. These are items that I don't use often enough to warrant having them in with all my other make up. Poor neglected eye shadows...

BOTTOM DRAWER:

Before

This drawer stored exactly what it looks like - extra make up bags and bits and bobs. This drawer is the most inconvenient for me to use, y'know having to bend down and all. So I've now kept all travel related beauty items in here. 
After

This drawer now not only houses all my travel bags, but also any travel sized containers. This way, when I do need to pack to head off somewhere everything is in this one place. Too easy! 

So far this system is working really well for me. Everything now has a home and I know exactly where to find things. Once things are in this state I'm quite good at putting things back where they belong so this will be an easy system for me to maintain; especially when I'm bleary eyed and ready for bed. 
The most important thing to keep in mind when re-organising a space in your house is how you use the space currently, and what you can do to make it not only more efficient, but easy to use without thinking about it. 

How do you organise your bathroom drawers? Anyone else cursed with absolutely zero space? What are YOUR tips?

post signature

Twitter | Youtube | Instagram | Pinterest | Hellocotton | Bloglovin
SHARE:
© Where is my mind?. All rights reserved.
Blogger Template by pipdig